How to Bulk-Import Products into Tracepos
Last Updated: August 21, 2026
This is the main guide for populating your Tracepos account with your products. Importing your product list allows you to quickly add your entire inventory, including stock levels, pricing, and supplier information, in a single step.
Crucial Prerequisites: Before You Begin
Before you can import your products, your Tracepos account must be correctly set up. The product import template requires information that must already exist in the system.
Please complete the following four setup steps before proceeding.
1. Import Your Product Categories
Your product sheet will require you to assign a category to each item. You must import your categories list first.
- Action: Follow our guide: How to Bulk-Import Product Categories
2. Import Your Product Brands
Every product can be assigned to a brand. This list must exist in the system before you import your products.
- Action: Follow our guide: How to Bulk-Import Brands
3. Create Units of Measurement
You need to define how your products are sold (e.g., "piece", "pack", "kg", "bottle"). These units must be created in your settings before you can assign them to products in the import sheet.
What is a Unit of Measurement? It is the standard by which a product is sold or measured. Selling a drink by the "bottle" is different from selling it by the "case". Defining these units is essential for accurate inventory tracking.
- Action: Follow the guide to create all necessary units: How to Create Units of Measurement
4. Create Taxes (VAT)
If you charge tax on your products, you must create the tax type (e.g., VAT) in your settings first.
- Action: Follow the guide to create your business taxes: How to Add Tax on Tracepos
Once you have completed all four of these prerequisite steps, you are ready to import your products.
Step 1: Download the Product Import Template
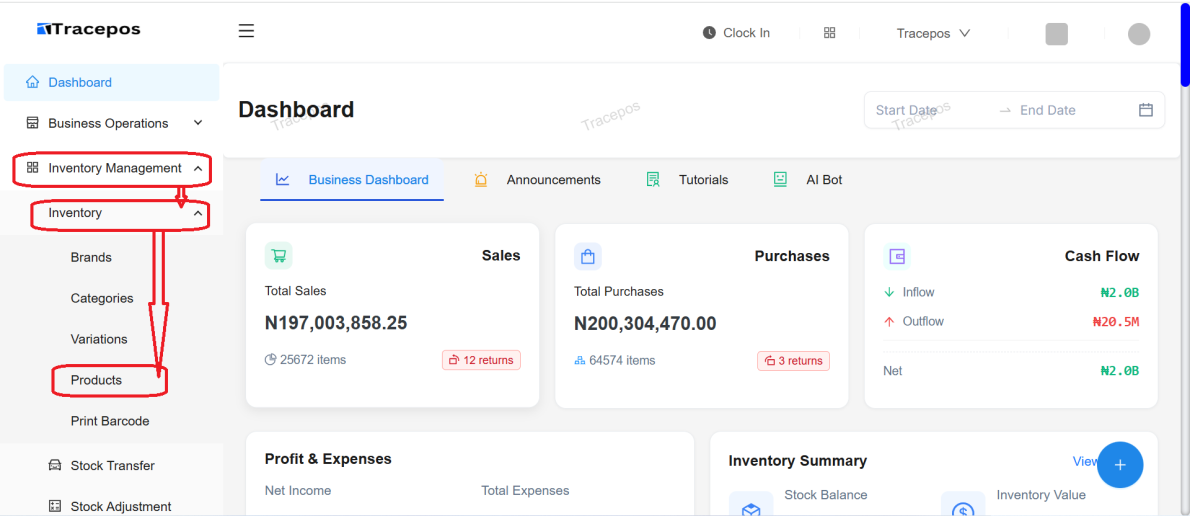
- From your Tracepos dashboard, navigate to the side menu and click on Inventory Management.
- From the dropdown menu that appears, select Inventory, and then choose Products from its submenu.
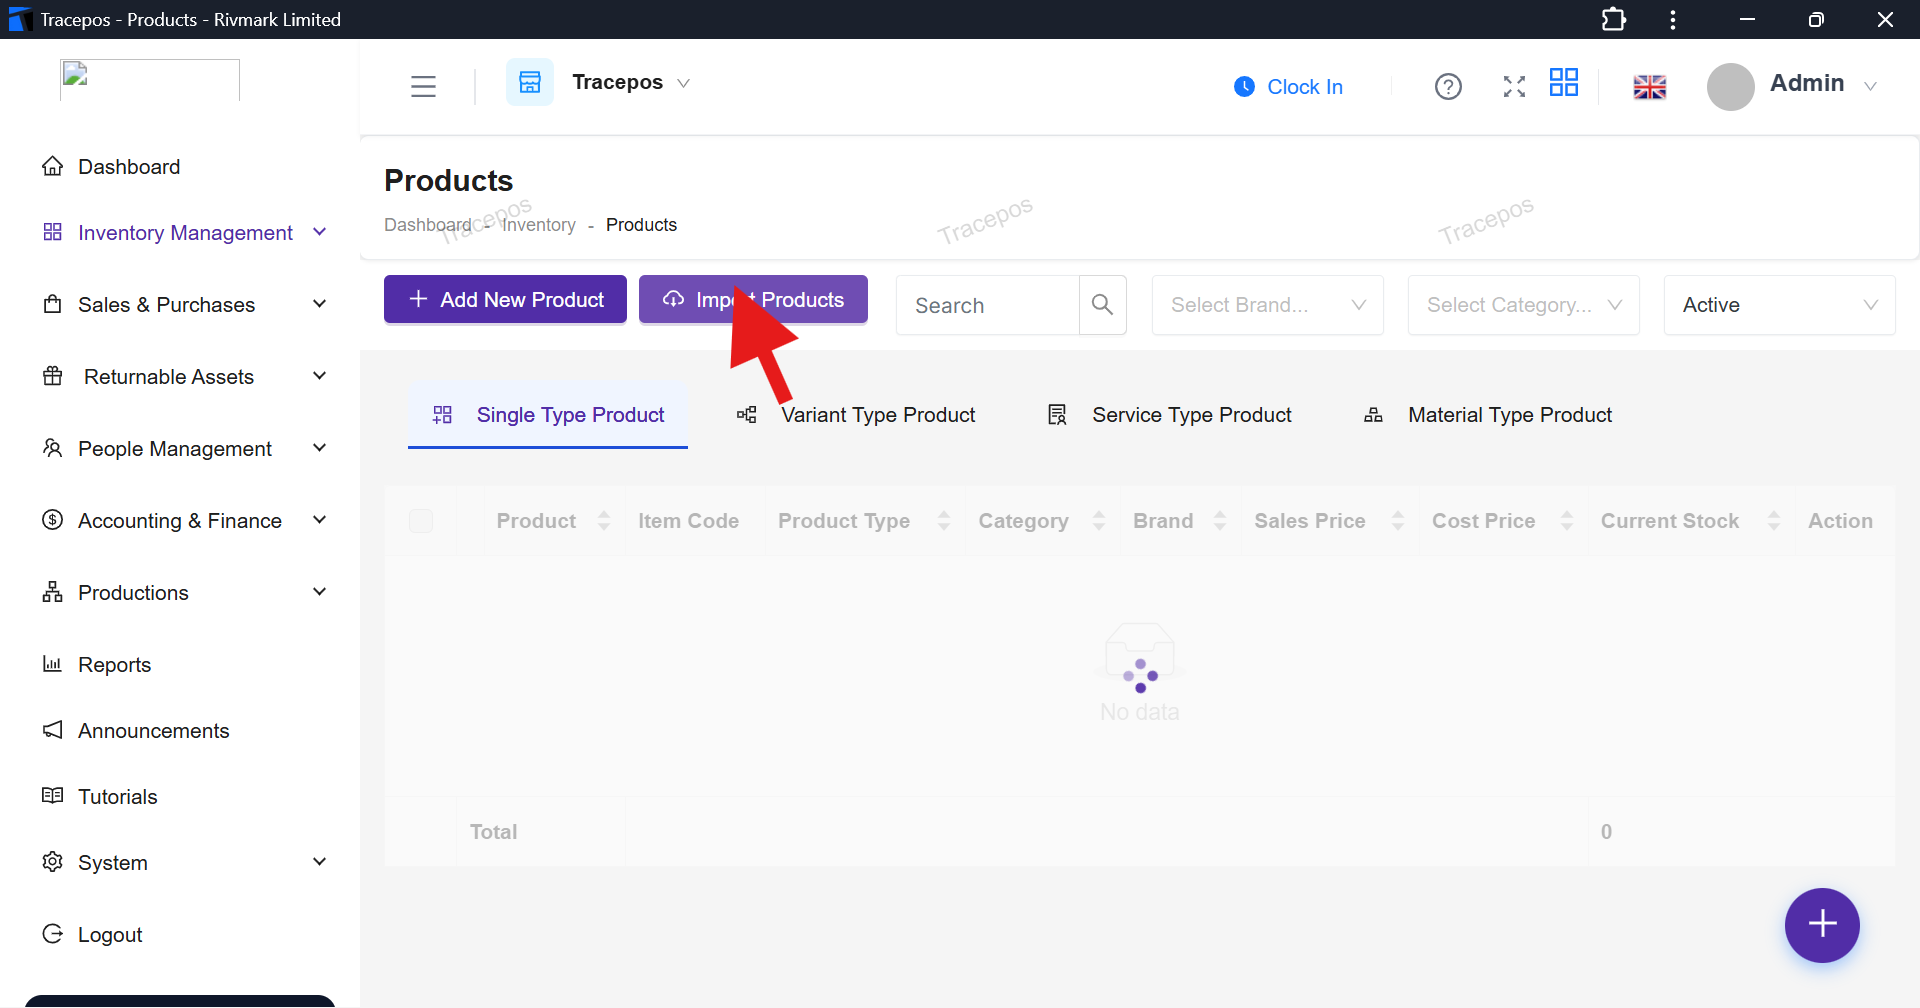
- On the Products page, click the Import Products button located at the top left.
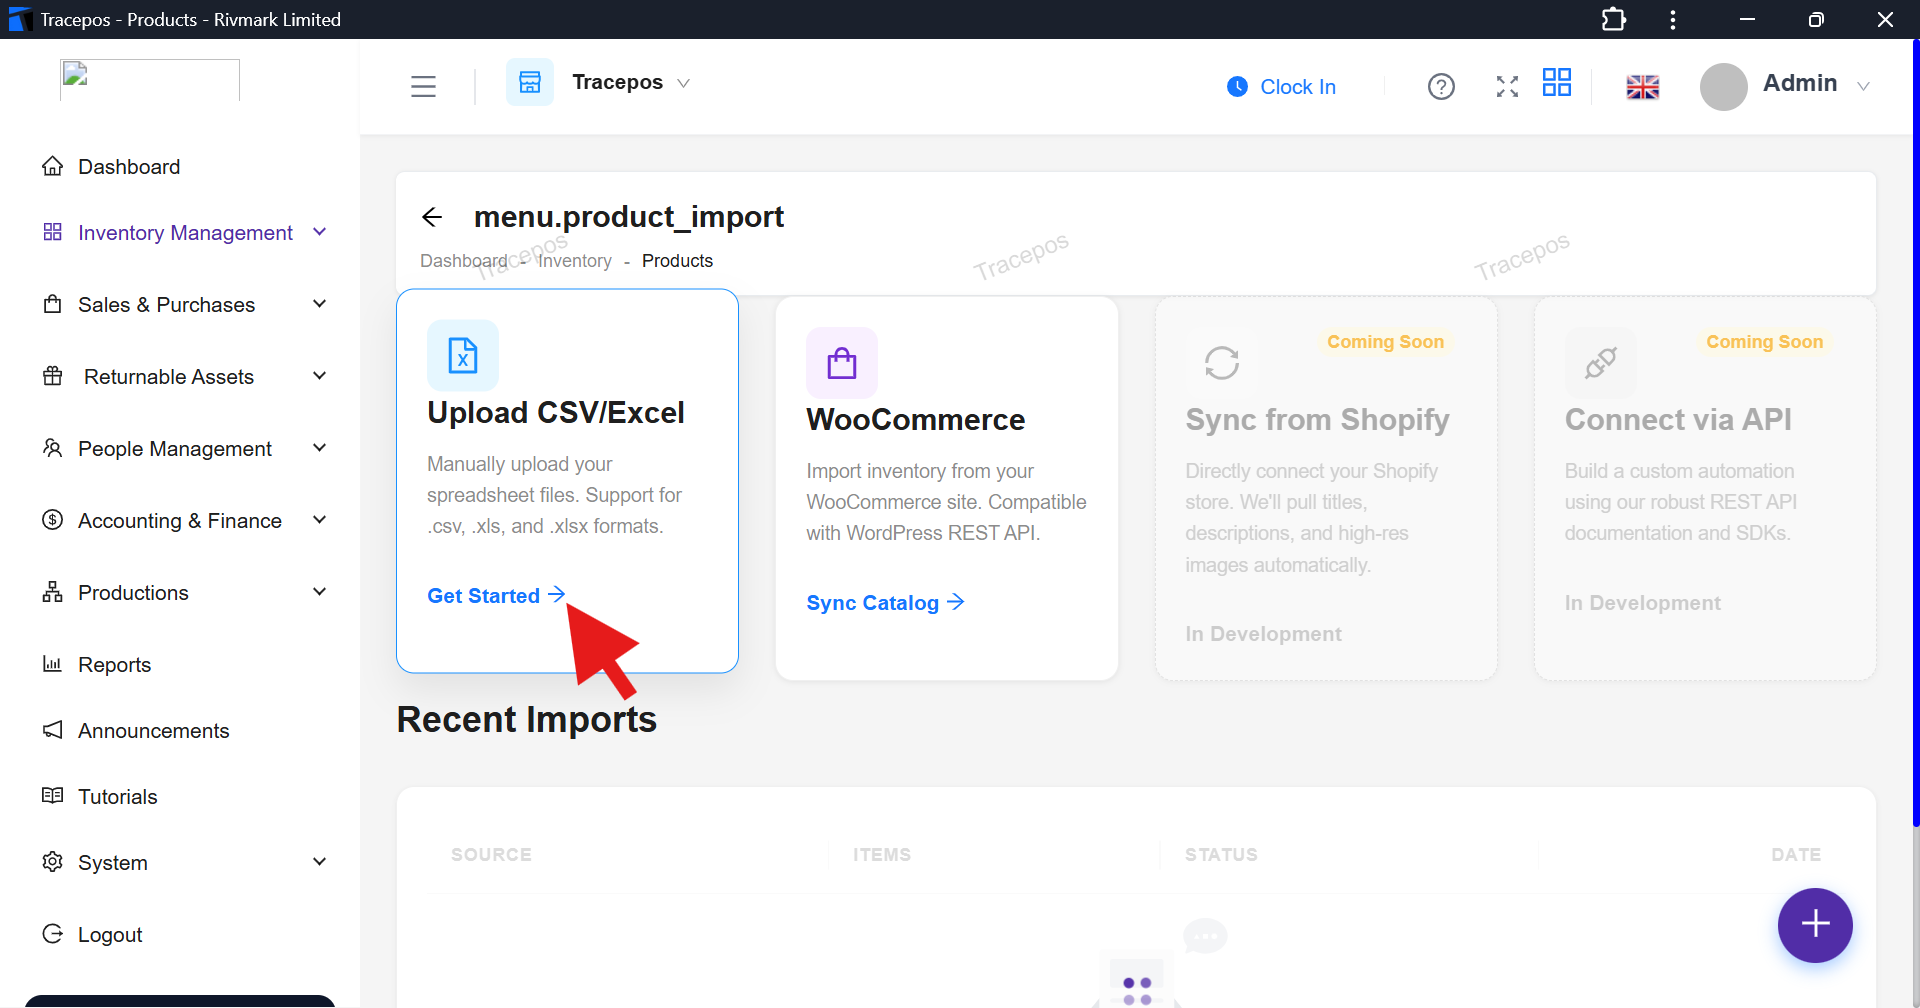
- On the new screen click on the "Get Started" link that on the "Upload CSV/Excel" card.
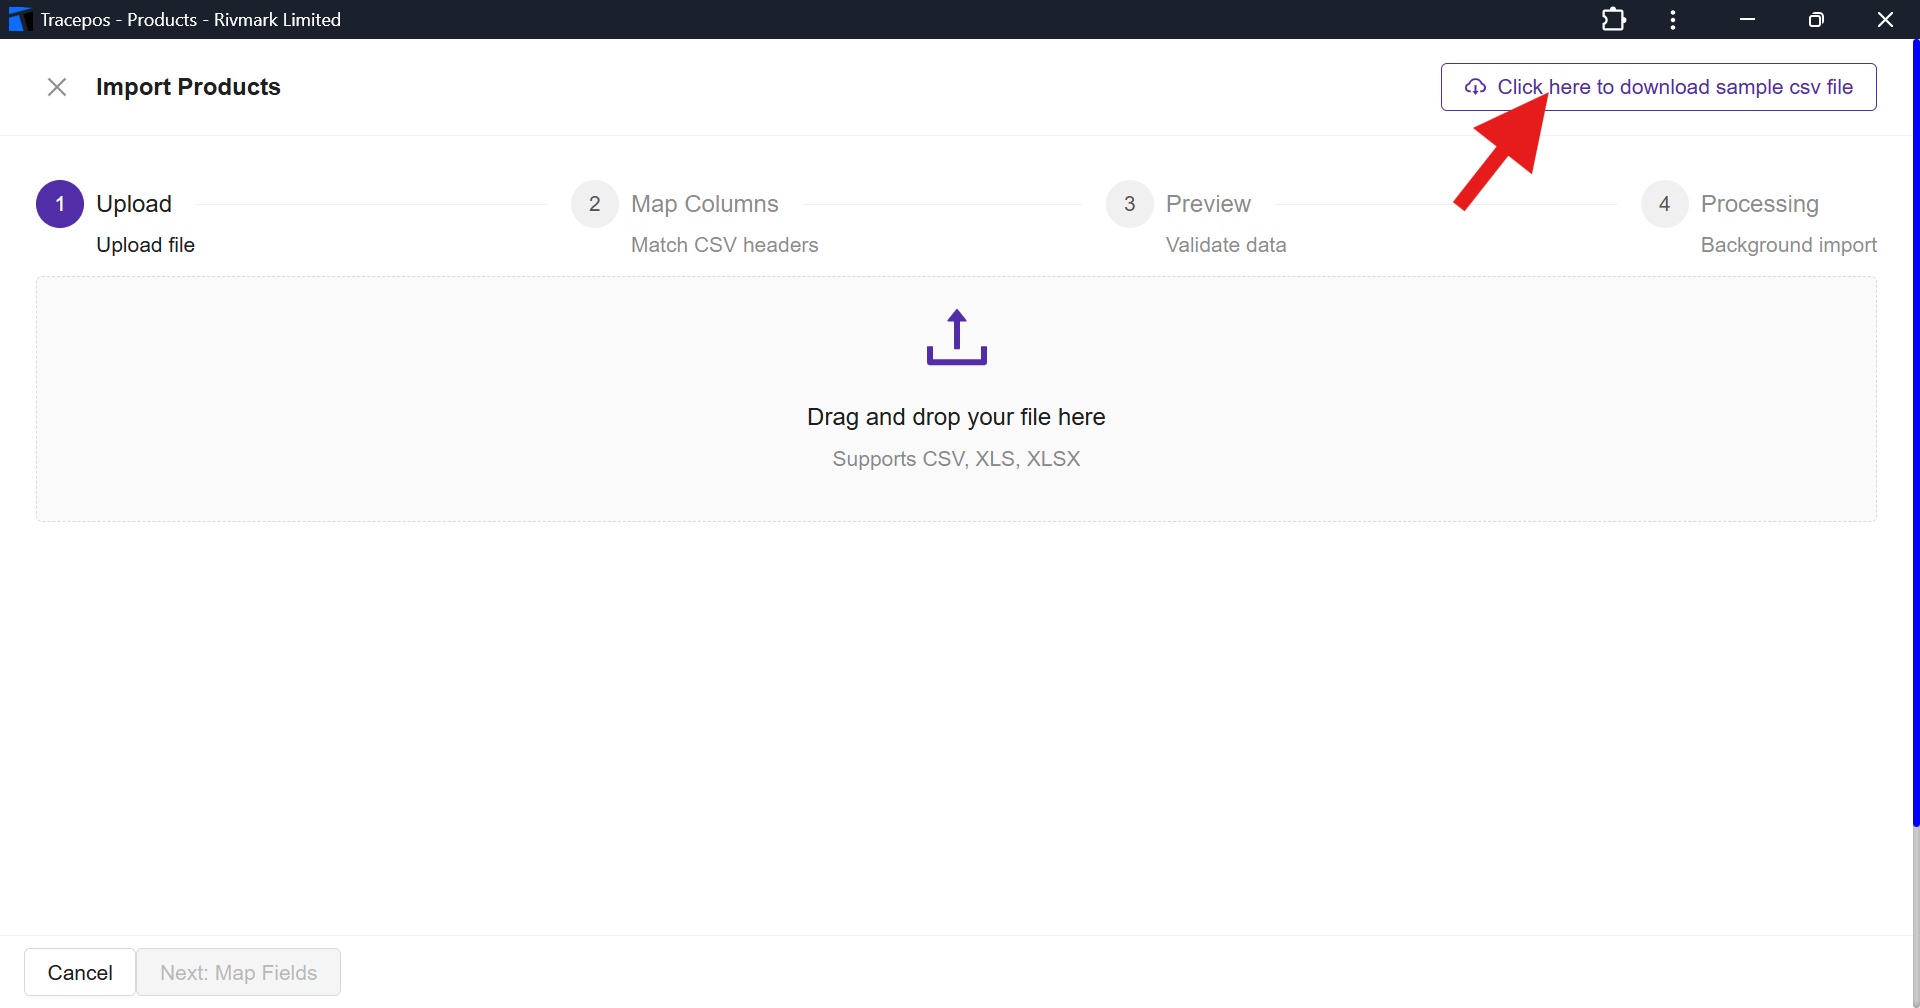
- A new screen will appear. Click on the blue hyperlink text that says "Click here to download sample csv file". This will download the template named
sample_products.csvto your computer.
Step 2: Understanding and Filling the Product Template
This is the most detailed step. Open the sample_products.csv file in Excel or Google Sheets. Below is a detailed explanation of each column based on the updated template.
Note: The names you use for unit, category, brand, tax, and warehouse must EXACTLY match what you have created in Tracepos.
| Column Name | Explanation | Example |
|---|---|---|
| name | (Required) The name of your product as it will appear on receipts and in reports. | iPhone 15 |
| item_code | (Required) The product's unique identifier, SKU (Stock Keeping Unit), or barcode number. If the product has no official barcode, you can create your own unique code here. | 6786883 |
| barcode_symbology | The type of barcode you are using. CODE128 is the most popular and recommended choice. Other options include CODE39, EAN8, EAN13, and UPC. | CODE128 |
| product_type | Indicates the configuration of the product. Typically used to distinguish a standard item from a variation. | Single |
| parent_item_code | If the item is a variation, enter the item_code of the main (parent) product it belongs to. Leave blank for standalone products. | 6786883 |
| variation_name | The name of the variant attribute being offered (e.g., Color, Size). | Color |
| variation_value | The specific value of the variation attribute for this item. | Red |
| unit | (Required) The base unit of measurement for this product. This must match a unit you created in your settings. | piece |
| dual_unit | Enter "y" if the product is sold using multiple units of measure (e.g., pieces and packs). Leave blank if not. | y |
| uoms_0 | The name of the alternative unit of measurement. | Pack |
| operator_0 | The mathematical operator used to convert the base unit into the alternative unit (typically * for multiply or / for divide). | * |
| operator_value_0 | The numerical value used with the operator to calculate the alternative unit (e.g., 10 pieces in a Pack). | 10 |
| alternative_price | The specific selling price when the product is sold in its alternative unit. | 900000 |
| description | A brief description of the product. This is optional. | Latest model with 256GB storage |
| category | (Required) The category this product belongs to. This must match a category you previously imported. | Mobiles |
| brand | The brand of the product. This must match a brand you previously imported. | Apple |
| tax | The name of the tax applied to this product. This must match a tax you created in your settings. Leave blank if not taxable. | VAT |
| mrp | Maximum Retail Price. Set to 0 if not applicable. | 800 |
| purchase_price | (Required) The cost price of the product (what you paid to acquire it). Enter numbers only. | 650 |
| sales_price | (Required) The selling price of the product (what the customer pays). Enter numbers only. | 700 |
| purchase_tax_type | How purchase tax is calculated. Choose exclusive (tax is added on top of the purchase price) or inclusive (tax is already included in the purchase price). | exclusive |
| sales_tax_type | How sales tax is calculated. Choose exclusive (tax is added on top of the selling price at checkout) or inclusive (tax is already included in the selling price). | exclusive |
| stock_quantity_alert | The low-stock threshold. When the quantity in stock for this item reaches this number, it will appear in your low-stock reports, reminding you to reorder. | 10 |
| opening_stock | (Required) The current quantity of this item you have in stock right now. | 20 |
| opening_stock_date | The date you counted your opening stock. Optional, but recommended to use the current date. (Format: YYYY-MM-DD) | 2025-07-22 |
| wholesale_price | If you offer a discount for bulk purchases, enter the special wholesale price per unit here. | 680 |
| wholesale_quantity | The minimum quantity a customer must buy to get the wholesale_price. Leave blank if you don't offer wholesale pricing. | 50 |
| expiry_date | If the product expires (e.g., food, medicine), enter the expiry date here. (Format: YYYY-MM-DD) | Leave blank if n/a |
| batch_number | (Required if using Expiry Date) The batch or lot number for this expiring product. This is essential for tracking specific batches. | Leave blank if n/a |
| warehouse | (Required) The name of the warehouse or store where this stock is located. This must exactly match a warehouse name from your Settings. | main shop |
Step 3: Upload the Product File to Tracepos
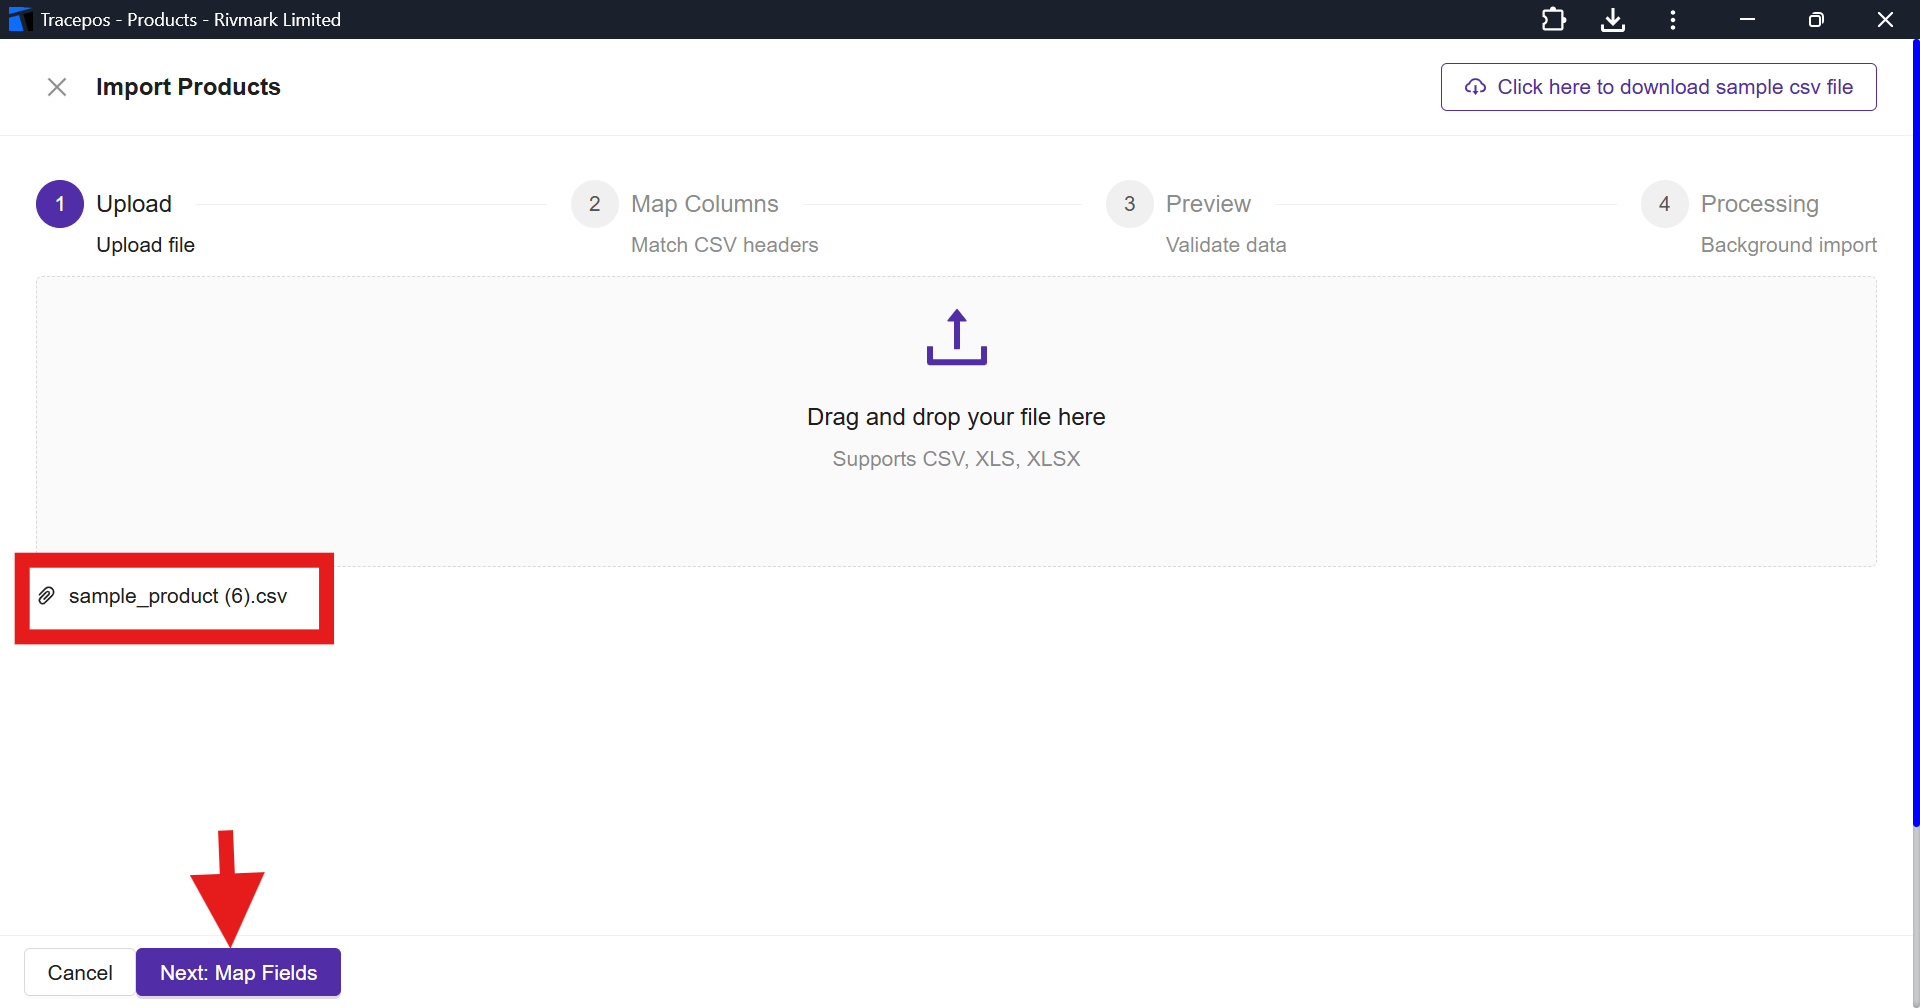
Once you have filled out and saved your sample_products.csv file, you can upload it.
Return to the Import Products screen in Tracepos. Click the "Drag and drop your file here" area.
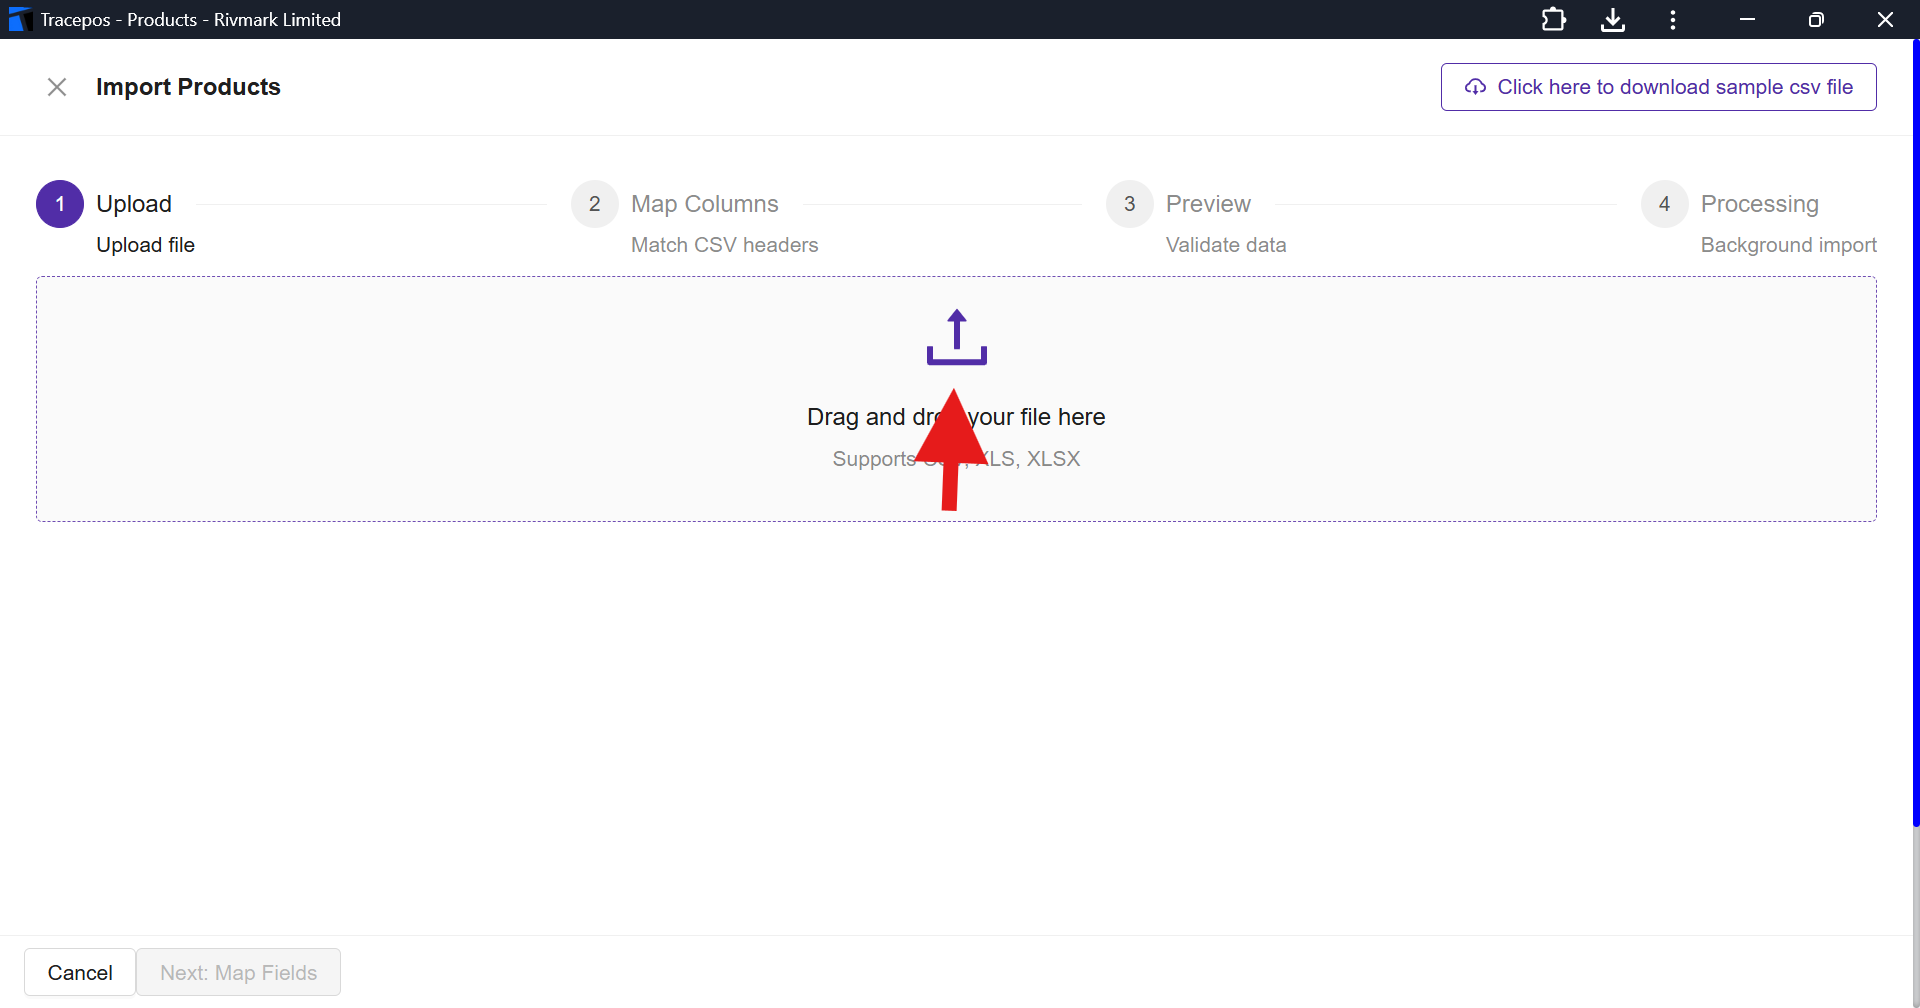
Locate the sample_products.csv file you just saved and select it.
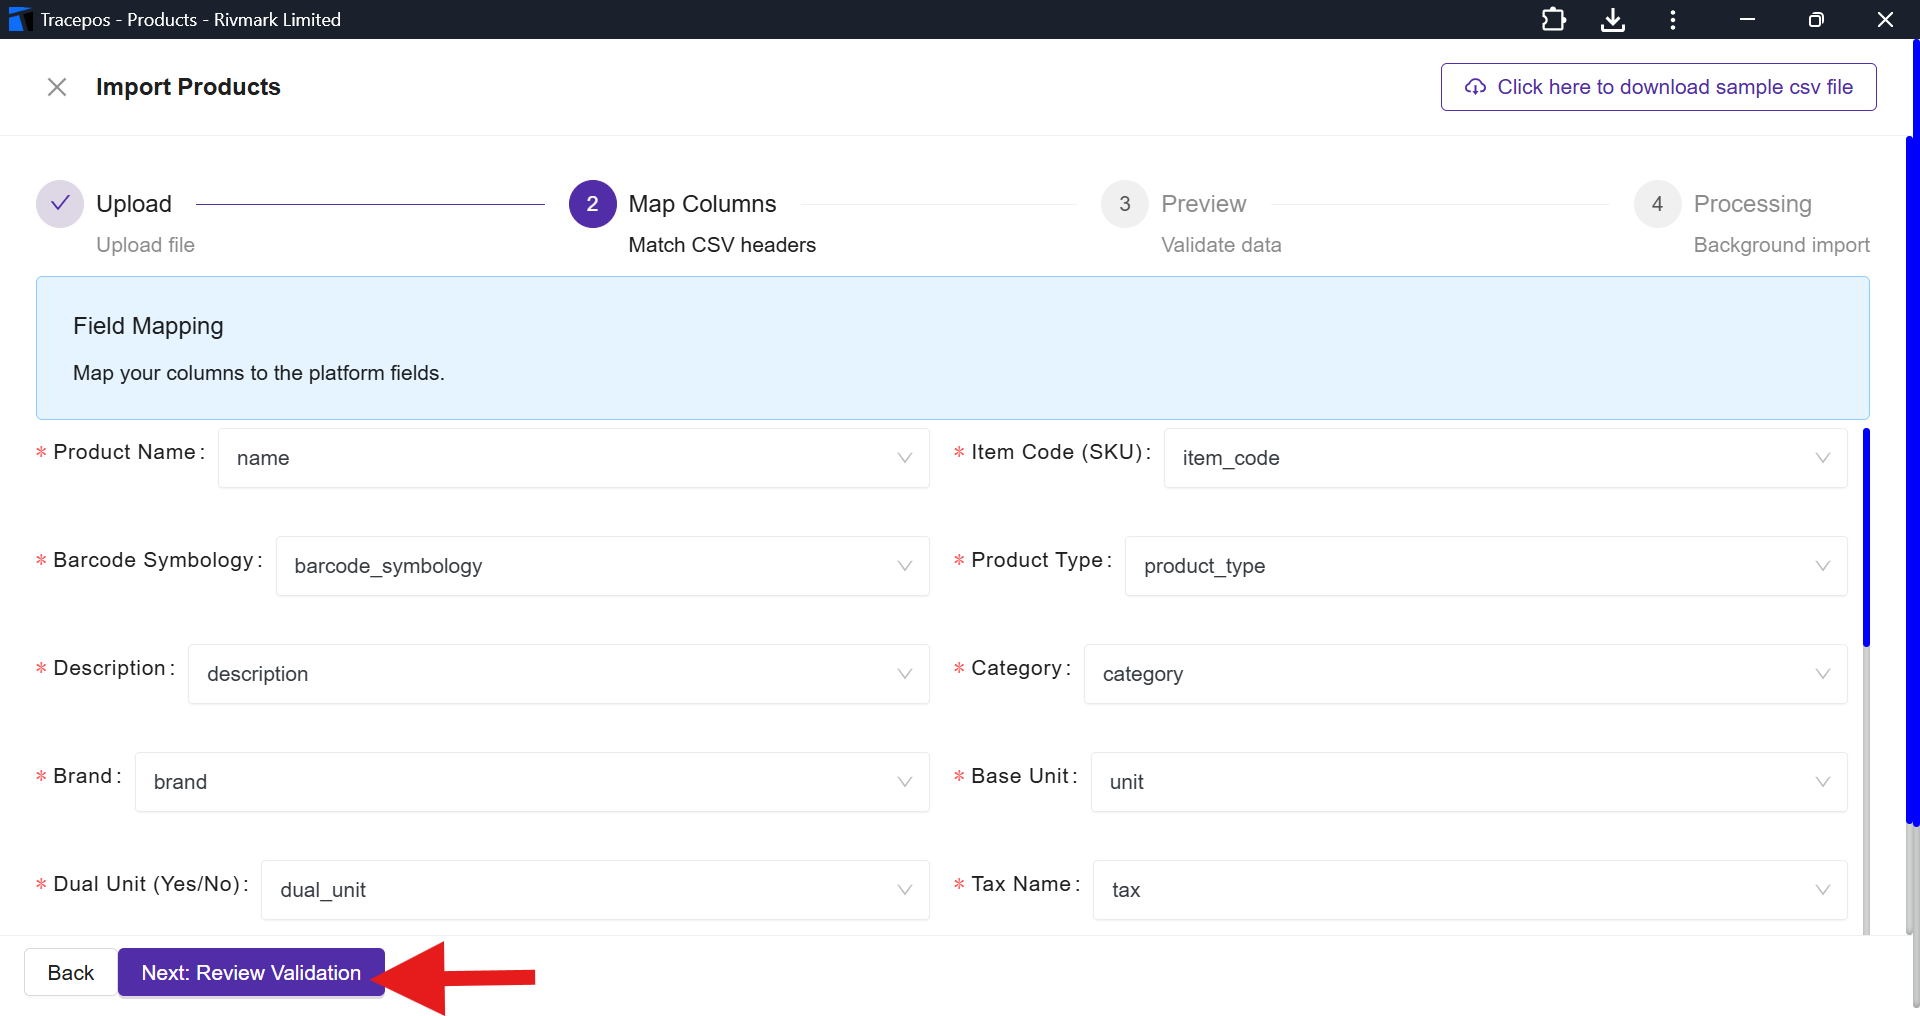
After your file is uploaded and you click the "Next: Map Fields" button, you will be directed to the Field Mapping screen.
This step ensures that Tracepos correctly reads the data from your spreadsheet by matching the system's required fields to your specific column headers.
What you need to do:
- Review the Mappings: Look at the pairs on the screen. The platform field is on the left, and a dropdown menu containing your spreadsheet's column headers is on the right.
Example: Product Name should be matched with the name column.
Example: Item Code (SKU) should be matched with the item_code column. - Confirm the Auto-Match: If you used the official Tracepos CSV template from the previous step and did not alter the column names, the system will automatically map these fields for you. Simply scroll through to verify that they line up correctly.
- Check Required Fields: Pay special attention to any field marked with a red asterisk (*). These are mandatory, and a corresponding column from your spreadsheet must be selected for the import to work.
- Proceed to the Next Step: Once you are satisfied that all columns are mapped accurately, scroll to the bottom of the page and click the purple "Next: Review Validation" button.
Step 4: Preview and Validate Data
After mapping your fields and clicking next, you will arrive at the Preview screen. This is a crucial safeguard where Tracepos scans your spreadsheet to ensure the data is formatted correctly before permanently adding it to your inventory.
Here is how to interpret the dashboard on this screen:
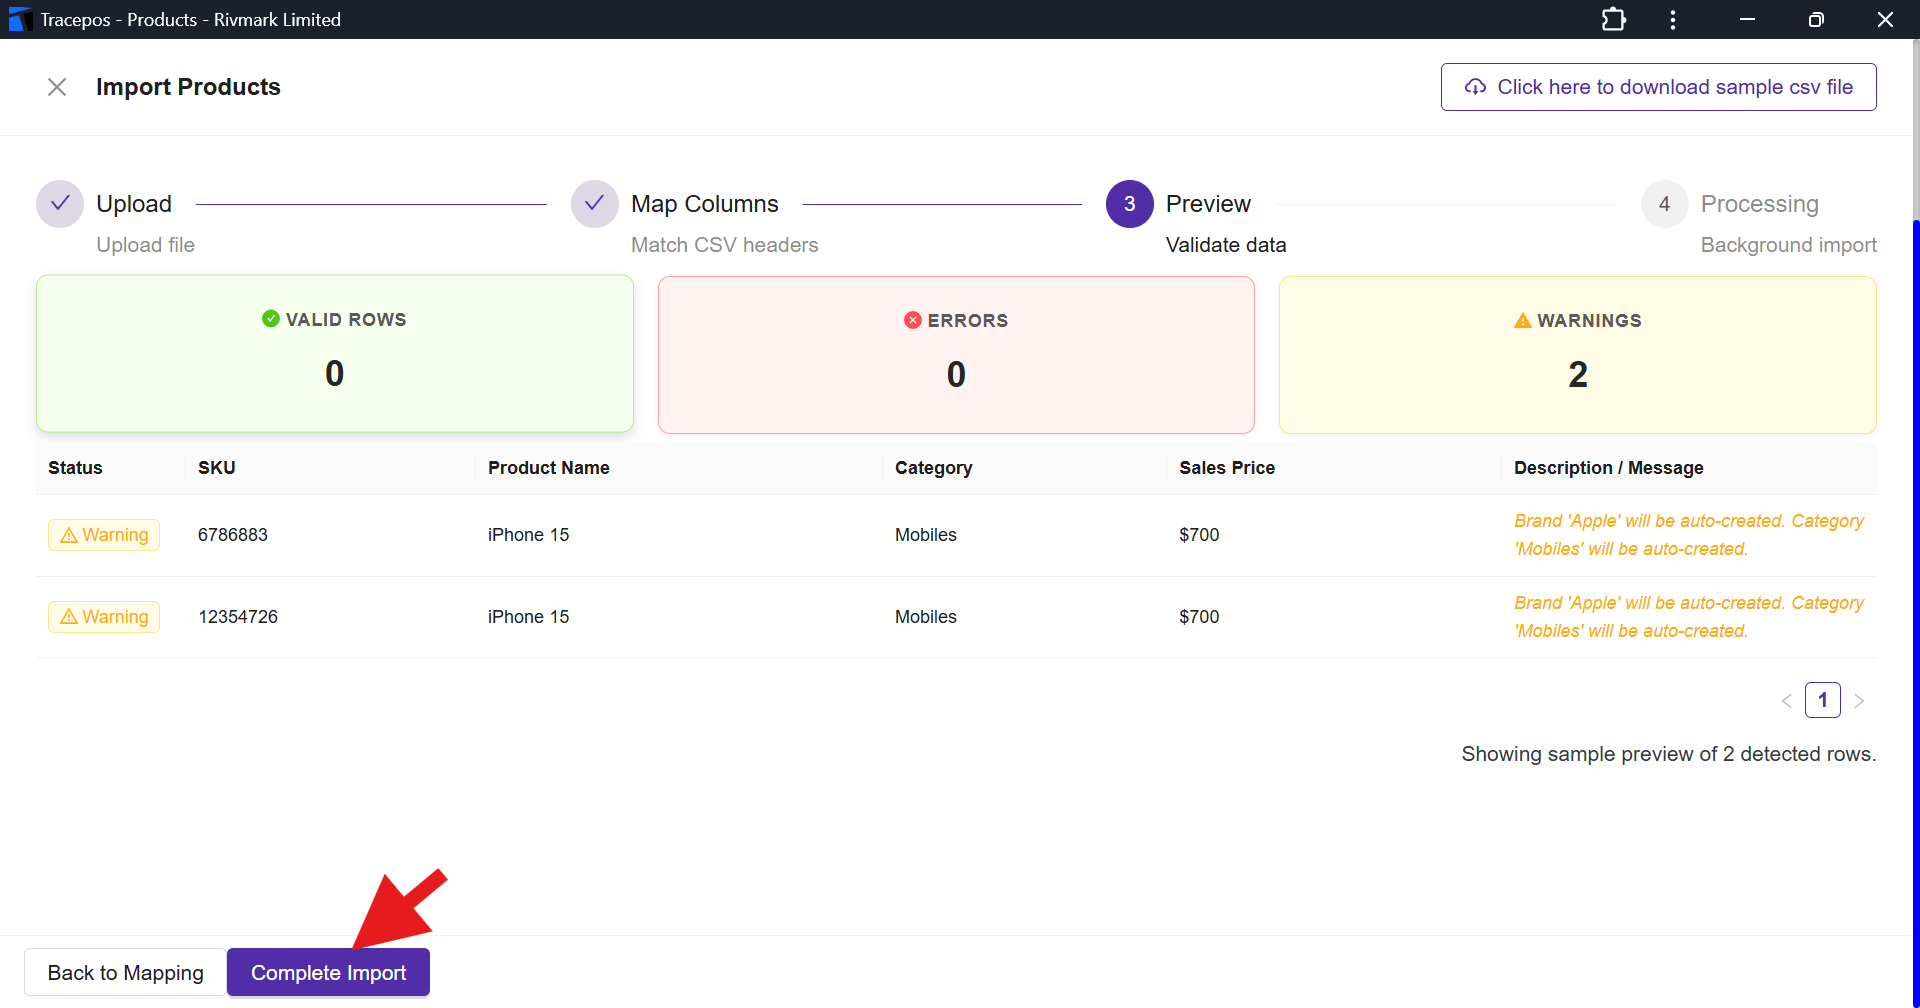
- Valid Rows (Green): These are the product rows that are perfectly formatted and ready to be imported without any issues.
- Errors (Red): If you have missing required fields (such as leaving the unit or purchase price blank) or incorrect data types, they will be flagged here. Note: You cannot import rows with errors. If errors are detected, you will need to correct them in your original spreadsheet, click "Back to Mapping," and re-upload the file.
- Warnings (Yellow): Warnings will not prevent your products from importing; they are simply notifications about actions the system is taking on your behalf. For example, if you include a Category (e.g., 'Mobiles') or a Brand (e.g., 'Apple') in your spreadsheet that you haven't manually created in your Tracepos settings yet, the system warns you that it will automatically create them for you during the import process.
Completing the Import: Scroll through the sample preview table at the bottom to double-check that your product names, SKUs, and prices line up with the correct columns.
Once you have reviewed the validation statuses and are satisfied with the data, click the purple "Complete Import" button at the bottom left corner. The system will then process the file in the background and populate your Tracepos inventory!
Step 5: Processing and Completion
Once you click the "Complete Import" button, the system will take over and process your file in the background. When it finishes, you will be directed to the final Processing screen.
As shown below, a green checkmark indicating "Import Completed!" will appear in the center of your screen alongside a confirmation pop-up at the top right.
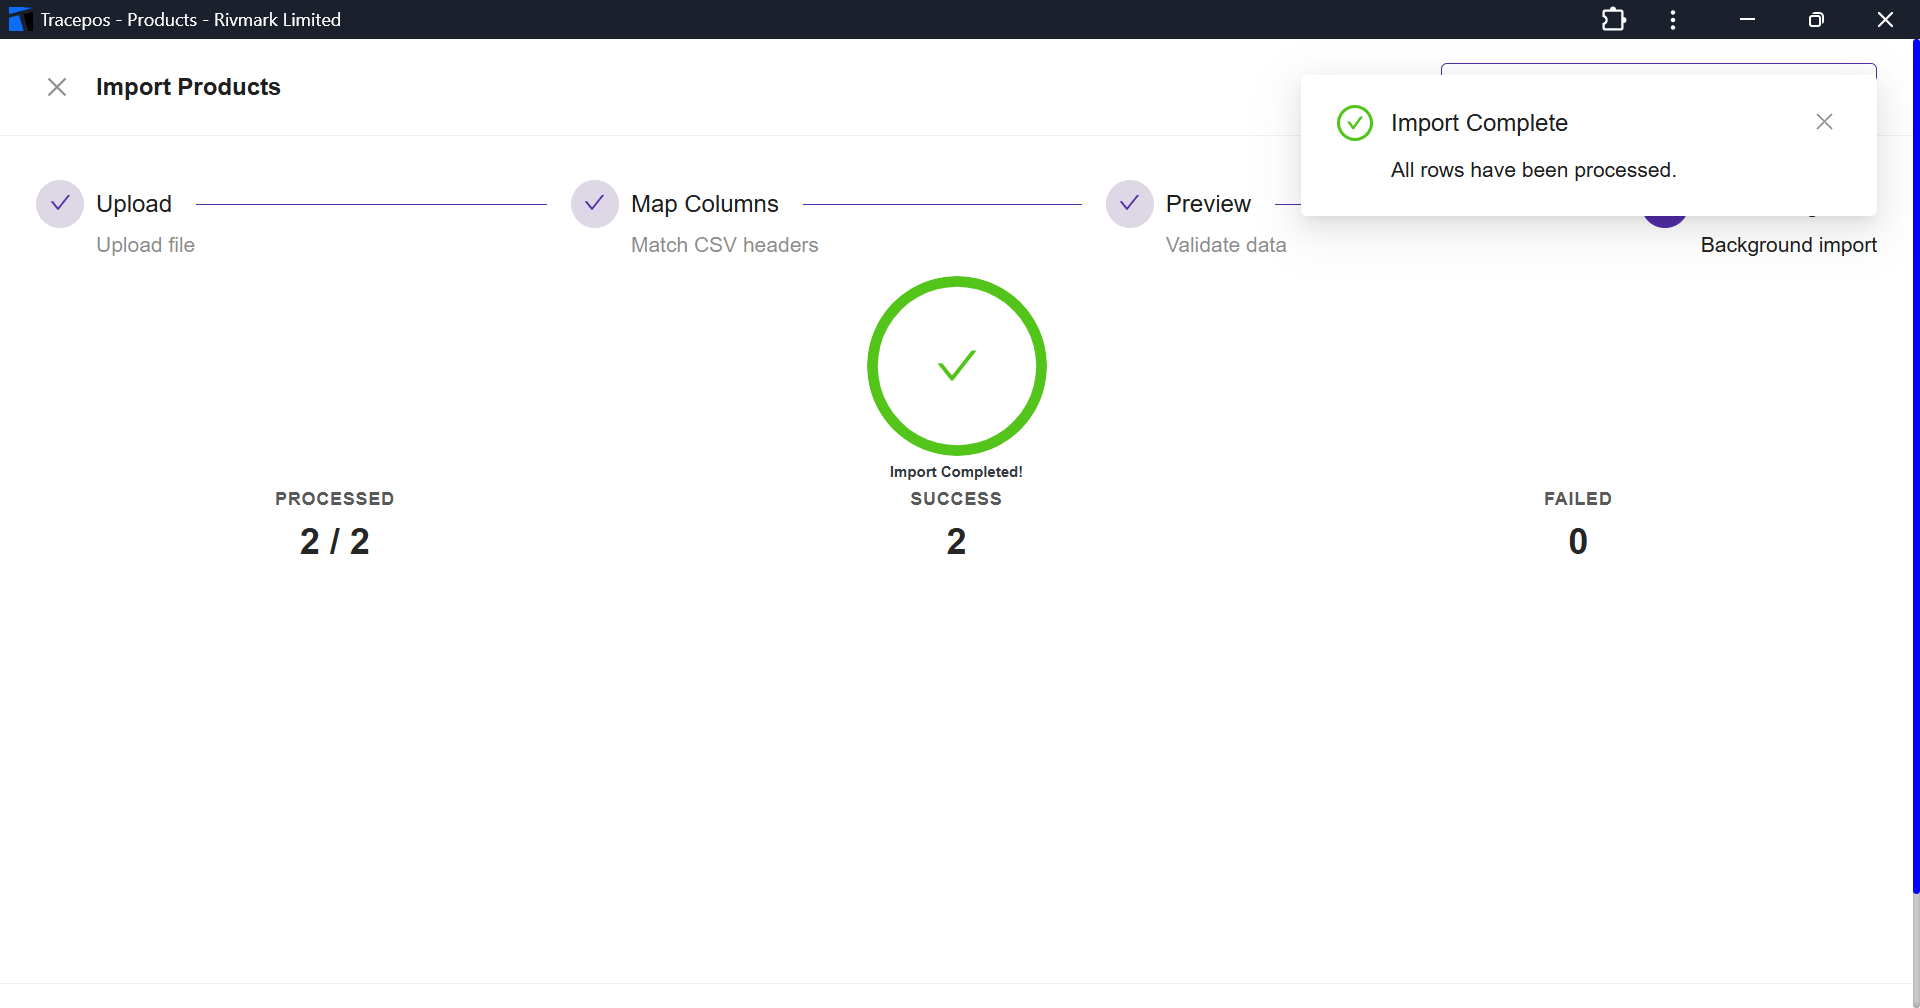
This dashboard provides a final summary of your import operation:
- Processed: The total number of product rows the system read from your spreadsheet.
- Success: The number of products that were successfully created and added to your Tracepos inventory.
- Failed: The number of rows that failed to import. If you cleared all the red errors during the preview step, this number should confidently sit at 0.
What's Next?
You can now close the import window and navigate back to your main Products dashboard to view, manage, and start selling your newly imported inventory!
Congratulations! Your business is now fully stocked and ready to start selling with Tracepos.